[ad_1]
Basically, you may need to substitute your Wi-Fi router each 5 years or so. However if you swap out your outdated Wi-Fi router with a more moderen one, you’ll be able to spend time making an attempt to persuade somebody to take a five-year outdated router off your palms, or you’ll be able to flip it into an exterior entry level, or AP. Putting this DYI AP on the far finish of your house and connecting it to the brand new router (through a protracted community cable) is an effective way to blanket your house with Wi-Fi with out shelling out lots of of {dollars} for a brand-new mesh system.
Your own home Wi-Fi router has an embedded AP (and even two or three embedded APs within the case of a dual-band or tri-band router) along with its operate as a fundamental router. APs broadcast Wi-Fi alerts that wi-fi shoppers like smartphones, tablets and laptops can hook up with.
For the needs of this information, let’s seek advice from the brand new router that hosts your house community as Router A. The outdated and busted one you may be changing into an AP is Router B. The target right here is to make Router B operate as an exterior AP for Router A.

Many routers in the previous couple of years can work in Entry Level mode, which might be turned on utilizing the interface.
Word that some Wi-Fi routers function an Entry Level mode (you may see that in its options listing if it does). If that is the case in your Router B, you’ll be able to simply flip this mode on and it’ll begin working as an AP. This information is simply vital for Wi-Fi routers that should not have this function (or if you do not know tips on how to flip the function on) and is simply applicable for routers which have an internet interface, which fortunately is the case for many routers in the marketplace.
Normal route (for networking specialists)
In case you’re snug with configuring routers and networking usually, what follows is the final route you may need to take.
1. Cowl Router B’s WAN (Web) port with a chunk of tape. You may need to keep away from utilizing the port as doing so would forestall you from changing the router into an AP.
2. Discover out what router A’s vary of IP addresses is. For instance, if Router A’s IP adress is 192.168.1.1 then we are able to safely assume its IP pool ranges from 192.168.1.2 to 192.168.1.254.
3. Manually set Router B’s IP tackle to an unused IP inside Router A’s IP vary. For instance, you may make it 192.168.1.2. Simply be sure to have not and won’t manually use this IP for every other gadget.
4. Flip off Router B’s DHCP operate.
And also you’re accomplished. Now in case you join Router B (which is now not a router) to Router A utilizing a community cable (from LAN port to LAN port), it should operate as an Entry Level providing you with higher Wi-Fi vary in your units.
Detailed steps (for newbies)
Step 1: Ignore Router B’s WAN (Web) port.
In case your router does not function a local AP mode, then you definately’ll need to keep away from utilizing its WAN port in any respect. Utilizing the WAN will make the router routinely operate like a router as a result of that is the meant position of the gadget: a router connects to the web and shares that reference to the remainder of the community it hosts. That can now not be the operate of Router B in our venture. Depart this port alone or cowl it with a chunk of tape to keep away from utilizing it by chance.
(Word that for routers that function a local AP mode, you’ll truly make use of the WAN port. When in AP mode it should operate as a LAN port, permitting you to — and on this particular case solely — use the port so as to add one other wired gadget to the community.)
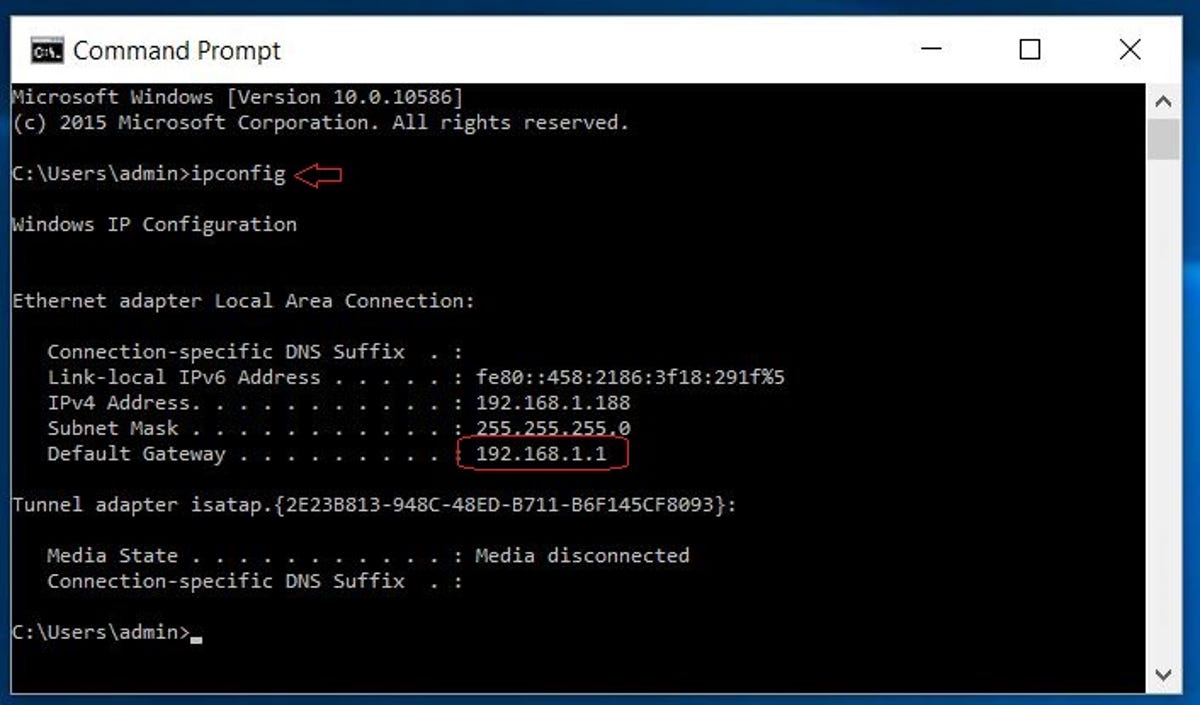
It is easy to seek out out the IP tackle of a community’s router.
Step 2: Discover out what Router A’s vary of IP addresses is.
It is a two-part step. First you may want to seek out out Router A’s IP tackle. Join a pc to Router A through Wi-Fi or with a community cable by means of one among its LAN ports.
If it is a Home windows laptop:
- Run the command immediate. You should utilize the keyboard shortcut Home windows key + R after which kind “cmd” and press Enter.
- On the Command Immediate window, kind ipconfig then press Enter. You will note a number of presumably complicated numbers and phrases, however the IP tackle situated to the correct of “Default Gateway:” is the tackle of the router. That is the quantity you need.
Or on a Mac:
Head to System Settings, then Community, then discover the present linked connection (you must see a inexperienced dot signifying the connection is working), then click on on Particulars subsequent to it. The router’s IP tackle can be proven on the backside.
After getting the router’s IP tackle (which at all times consists of 4 teams of numbers separated by a dot in between every group) use it to find out its IP vary. The vary of numbers you’ll choose from will use the identical numbers for the primary three teams with the final group starting from 1 to 254. The router’s present IP tackle is not going to be accessible to make use of.
For instance, if the router IP tackle is 192.168.1.1 then the IP pool of addresses will vary from 192.168.1.2 to 192.168.1.254. If the router’s IP is 192.168.1.254 then the IP vary can be 192.168.1.1 to 192.168.1.253. When a tool is linked to Router A and has an IP tackle inside its IP vary, it is going to be accepted as a part of the community. It could take a complete separate video and a whole different article to clarify why it really works this manner, however simply belief that it does.
For this information, we’ll assume 192.168.1.1 is Router A’s IP. This can even possible be your case as a result of many residence routers (from manufacturers resembling Netgear, Asus and D-Hyperlink) have a tendency to make use of this IP tackle by default.
Step 3: Set router B’s IP tackle as an unused IP throughout the IP vary of router A (don’t fret, we’ll clarify under what which means).
Join a pc to Router B through Wi-Fi or with a community cable by means of one among its LAN ports to seek out out what the router’s present IP is (repeat the primary a part of step 2 above to do that).
Log into the router’s internet interface by pointing a browser to its IP tackle. Throughout the interface, navigate to the part the place you’ll be able to change its default IP tackle. Relying on the router, this part tends to be referred to as Community, LAN or Setup. Change this IP tackle to a type of within the IP pool decided within the second a part of step 2 above. For instance, if Router A’s IP is 192.168.1.1, you may make the IP of Router B 192.168.1.2 (just be sure you have not manually assigned this IP to every other gadget, and if in case you have, select a unique IP tackle as an alternative) then save the adjustments. Router B will now possible restart to use the adjustments, which is able to take a minute or two to finish.
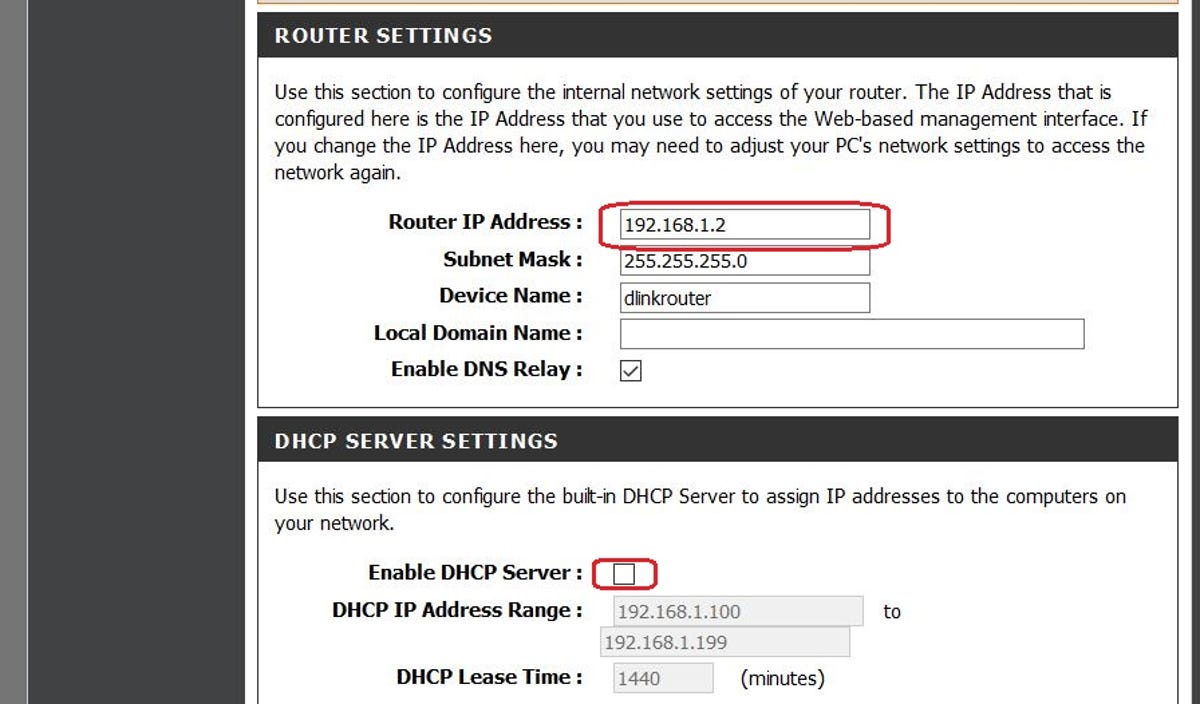
Turning off the DHCP server operate of the outdated router and assigning and unused IP of the primary router it should make power it to work as an entry level when its WAN port is just not used.
Step 4: Flip off Router B’s DHCP Server operate.
Log into Router B’s interface once more by pointing a browser to its new IP tackle you manually set in step 3 (in our case, it was 192.168.1.2) then once more navigate to its LAN or Community setup part. Right here, disable its DHCP server operate. That is one among a important capabilities of a router that leases out IP addresses and proper now you do not need it to do this, so make sure it is off. Save the adjustments and also you’re accomplished.
(Relying on the interface, some routers let you do step 3 and 4 as one step with out restarting.)
Now Router B, when linked to Router A utilizing a community cable, will work as a each a swap (permitting you to make use of its LAN port so as to add wired units to the community) and an entry level. You possibly can at all times login to both router’s interface utilizing their IP tackle — 192.168.1.1 (Router A) or 192.168.1.2 (Router B) on this information’s case — to vary their settings or customise their Wi-Fi networks.
In case you do not change any settings, Router B (now working as an AP) will nonetheless be named no matter you referred to as it if you have been utilizing it as a router. You possibly can change its title to be the identical as that of Router A’s if you would like units to connect with both one routinely, or preserve the names separate if you wish to make sure in case you’re linked to Router A or Router B. Both means, all units linked to both router can be a part of the identical community.
[ad_2]
Source