[ad_1]
I’ve at least 10 browser tabs open at one time. And it is too straightforward to get misplaced in them, losing time clicking round looking for the best window. That is why Mac cut up display screen view is so useful — I can arrange and customise my show so I can hold monitor of all my necessary data.
Break up display screen view permits you to hold two home windows working side-by-side concurrently. You may arrange two Google Chrome home windows subsequent to one another, or you possibly can select between completely different desktop apps like a video name and e mail. Break up display screen is also nice for when it is advisable to reference one thing, like an Excel spreadsheet, whereas writing a report. You too can use it to maintain a textual content chain open whereas in a Zoom name. Regardless of the way you select to make use of it, cut up display screen view saves you a whole lot of time and pointless toggling.
Save your self the time and frustration of trying to find misplaced tabs. Here is learn how to arrange cut up display screen view, swap out tabs and reset your show.
Learn Extra: All the New Features Coming to Your iPhone With iOS 18
How one can enter Break up View on a Mac
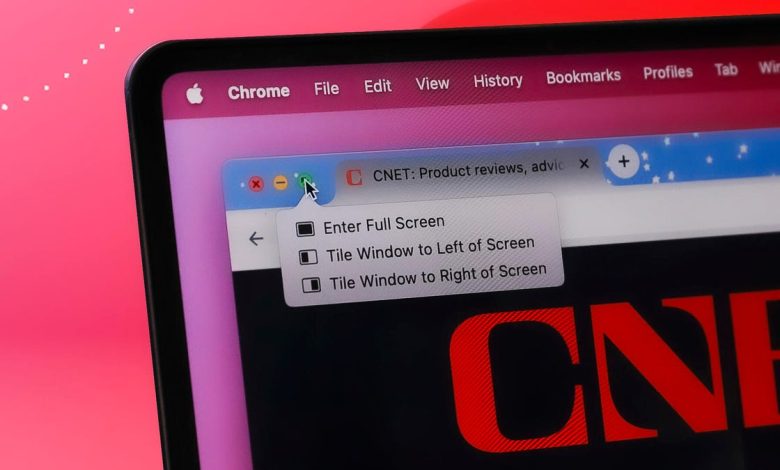
1. Be certain that neither window you need to use is in full-screen mode.
2. In one of many home windows you need to use, place your cursor over the inexperienced button within the prime left. As a substitute of clicking to maximise the window, hover till you see a drop-down menu.
3. Choose Tile Window to Left of Display screen or Tile Window to Proper of Display screen. Your Mac will mechanically enter split-screen mode.
4. From there, different open home windows will probably be displayed on the alternative facet of the display screen. Click on the window you need on the remainder of your display screen, and it’ll fill the remaining half.
5. If you wish to regulate the dimensions of the home windows, use the slider within the heart of the display screen.
In Break up View, you’ll take a look at each home windows concurrently. Multitask away!
Learn extra: This Is One Thing Every Mac Owner Should Know How to Do
How one can exit cut up display screen on Macs
In case you’re executed utilizing the split-screen format, this is learn how to get out of it:
1. Transfer your cursor to the highest of the display screen till you see the sizing buttons on the prime left of every window.
2. Click on the purple button to shut that window or the inexperienced button to exit cut up display screen.
3. Do not panic! Your different window continues to be open — it is simply hidden in full-screen mode. To entry it once more, press the Mission Management button (F3) on the highest row of your keyboard.
4. It’s best to see two choices on the prime of the display screen: Desktop and no matter window you had in split-screen mode. Click on the opposite window, and use the inexperienced sizing button within the prime left if you wish to exit full-screen mode.
In case you’re the sort of particular person (like me) who would possibly want greater than two home windows open, you possibly can at all times manually resize home windows to suit three or 4 in your display screen without delay. The expertise simply will not be as visually clear as utilizing tiled home windows.
What’s the keyboard shortcut for cut up display screen on Mac?
Mac keyboard shortcuts are plentiful and helpful, together with one for cut up display screen. Begin by utilizing management + command + F to enter full-screen mode. From there you possibly can hit F3 to drag up Mission Management, then drag and drop the second app you need in your cut up display screen subsequent to your unique window. It ought to show a preview of what the cut up display screen will appear like, together with a + (plus signal) subsequent to it. Click on again into the newly tiled apps and you will be in Break up View.
If you wish to get into Break up View even sooner, you possibly can create your own keyboard shortcut. Go to System Preferences > Keyboard > Keyboard Shortcuts > App Shortcuts. You may click on the + button so as to add a command named “Tile Window to Left of Display screen” utilizing your required shortcut. As soon as you have activated the shortcut, your lively window will tile to the left facet of the display screen and you may merely choose a second window to be added to your cut up display screen.
Learn Extra: The Keyboard Shortcut You’ll Use More Than Ctrl + Z
Why will not my Mac do cut up display screen?
First, be sure to’re not at present in fullscreen mode. The cut up display screen solely works from the traditional window view. If that is not the problem, go to System Preferences > Desktop & Dock and scroll to the underside to see whether or not Shows have separate Areas enabled. If not, allow it.
In case you do not see that possibility within the Mission Management menu, be sure to’ve up to date to MacOS 10.11 or later. You may verify your present OS model by clicking the Apple icon within the prime left menu after which choosing About this Mac. In case you’re utilizing an earlier model, you will should replace by clicking the Software program Replace button on that display screen.
Take into account that not all apps help cut up screens. In case you’ve tried the whole lot else and the app nonetheless will not tile in split-screen mode, the app in all probability would not provide split-screen mode.
How do you cut up screens on a Mac with out full display screen?
The official split-screen perform on Macs (referred to as “Break up View”) mechanically splits two home windows in full display screen. If you do not need the full-screen view (maybe since you need to have the ability to shortly navigate between browser tabs), you possibly can manually drag your home windows to suit the specified house. This selection provides you a bit of extra customization than Break up View.
For extra, take a look at the best new MacOS features that enhance Mac-iPhone connectivity and how to unlock your Mac if you’ve forgotten your password.
[ad_2]
Source